
State Diagram Editor Introduction Part III#
In the first part of the tutorial you learned how to create a first state diagram and to generate code from it. Then in the second part you learned the use of regions and what can be done with them.
In this third part of the tutorial you will learn how to simulate a created model to see for yourself if the machine does what it is supposed to do, or to walk through a model with colleagues or customers and confirm that the behavior is as expected.
A model can only be simulated if it is error free. The absence of errors can be checked with the check button in the button bar. If there are no errors, the simulation is available on the Simulation tab next to the state tree.
Simulation without timer#
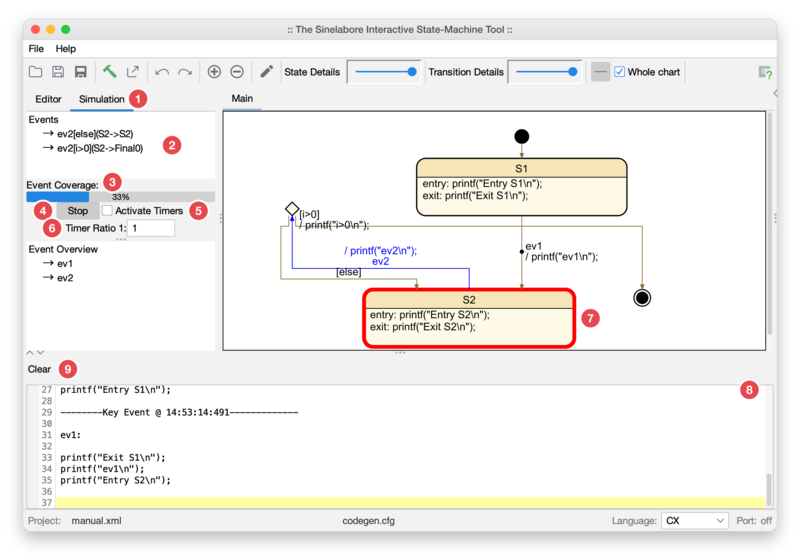
Open the Simulation tab and press Start. The machine enters its initial states; the active states are drawn with a red frame. The list at the top shows the events the active states (and their parents) react to, one row per transition, with guard and target. A click on an event triggers the state change, and the list then shows the events of the new active states. Events of a timer have to be triggered by a click just like all other events. A click on Stop ends the simulation.
- The
Simulationtab. - The events the active states react to. A guarded event has one row per guard, here
ev2[else]andev2[i>0]: the click decides which guard is true. - Event Coverage: the share of the machine’s transitions triggered so far; each guard counts on its own.
- Start and Stop.
- Activate Timers: run the timers written in the action code, see below.
- Timer Ratio: slows the simulated timers down.
- The active state, in red. The transitions it can take are drawn in blue.
- The output: the code “executed” for every step, in the order it runs.
- Clear empties the output.
The output makes it possible to track which actions are executed when the state changes; above, ev1 ran the exit code of S1, the transition action and the entry code of S2.
Note: actions refer to code entered as entry/exit/do code or transition actions.
Simulation with timer#
In state machines, one or more timers are often used to trigger time-controlled actions. Timers send a user-defined event to the machine at timeout. To simulate this semi-automatically, timer commands can be specified in action comments using a predefined notation. The timer commands are introduced by a special sequence, by default @@@, followed by one timer command in XML syntax, one command per line.
To activate timer simulation, check the Activate Timers option before pressing Start. Timer Ratio 1:n runs the timers n times slower than written, 1:1 by default. If timers fire faster than about 200 ms (depending on the computer), increase n; otherwise the real-time image build-up is no longer possible and other events may no longer be clickable.
The following commands are available. Times are always specified in ms. Every command names its timer with a unique id. When creating a timer, the event must be specified (in the example evTimeout), which is injected into the simulator when the timeout expires. Timers can fire cyclically or once.
<TimerCreate timeout_ms="400" id="T1" event="evTimeout"/>
<TimerStartOnce id="T1"/>
<TimerStartCyclic id="T1"/>
<TimerStop id="T1"/>
<TimerPause id="T1"/>
<TimerResume id="T1"/>
<TimerSetTimeout timeout_ms="400" id="T1"/>
<TimerIncrement value_ms="100" id="T1"/>
<TimerDecrement value_ms="100" id="T1"/>
TimerPause keeps the remaining time, and TimerResume continues from there. TimerSetTimeout takes effect at the next start. TimerIncrement and TimerDecrement also change the remaining time of a running timer.
The example is a microwave oven. Its action code calls the C functions of the real timer, and each call has the matching simulation command in a comment:
// entry code of Super: create the timer once
// @@@ <TimerCreate timeout_ms="3000" id="T1" event="evTimeout"/>

// evInc, an inner transition of Super (evDec likewise)
timer_inc();
// @@@ <TimerIncrement value_ms="1000" id="T1"/>

// evDoorClosed[timer_preset()>0] from Idle to Cooking
timer_start();
// @@@ <TimerStartOnce id="T1"/>

// evDoorOpen from Cooking to CookingPause, and evDoorClosed back
timer_pause();
// @@@ <TimerPause id="T1"/>
timer_cont();
// @@@ <TimerResume id="T1"/>

// evTimeout from Cooking to Completed
timer_clear();
// @@@ <TimerStop id="T1"/>
evInc and evDec are inner transitions of Super, so changing the time neither leaves Super nor runs its entry code a second time, which would create T1 again.
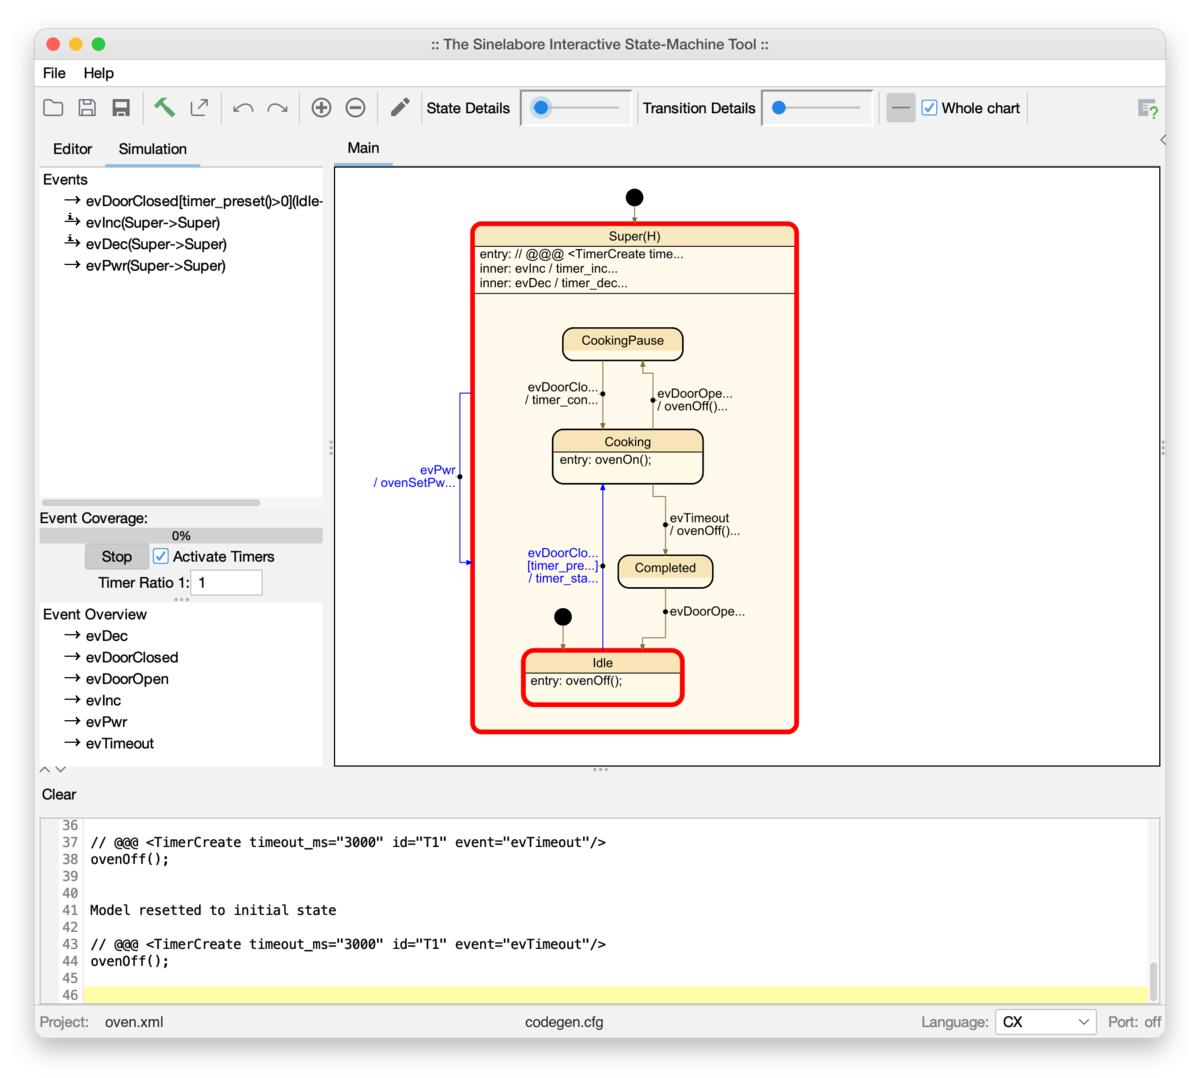
Activate Timers is checked and the simulation started: Super creates timer T1 with 3 s, the oven is Idle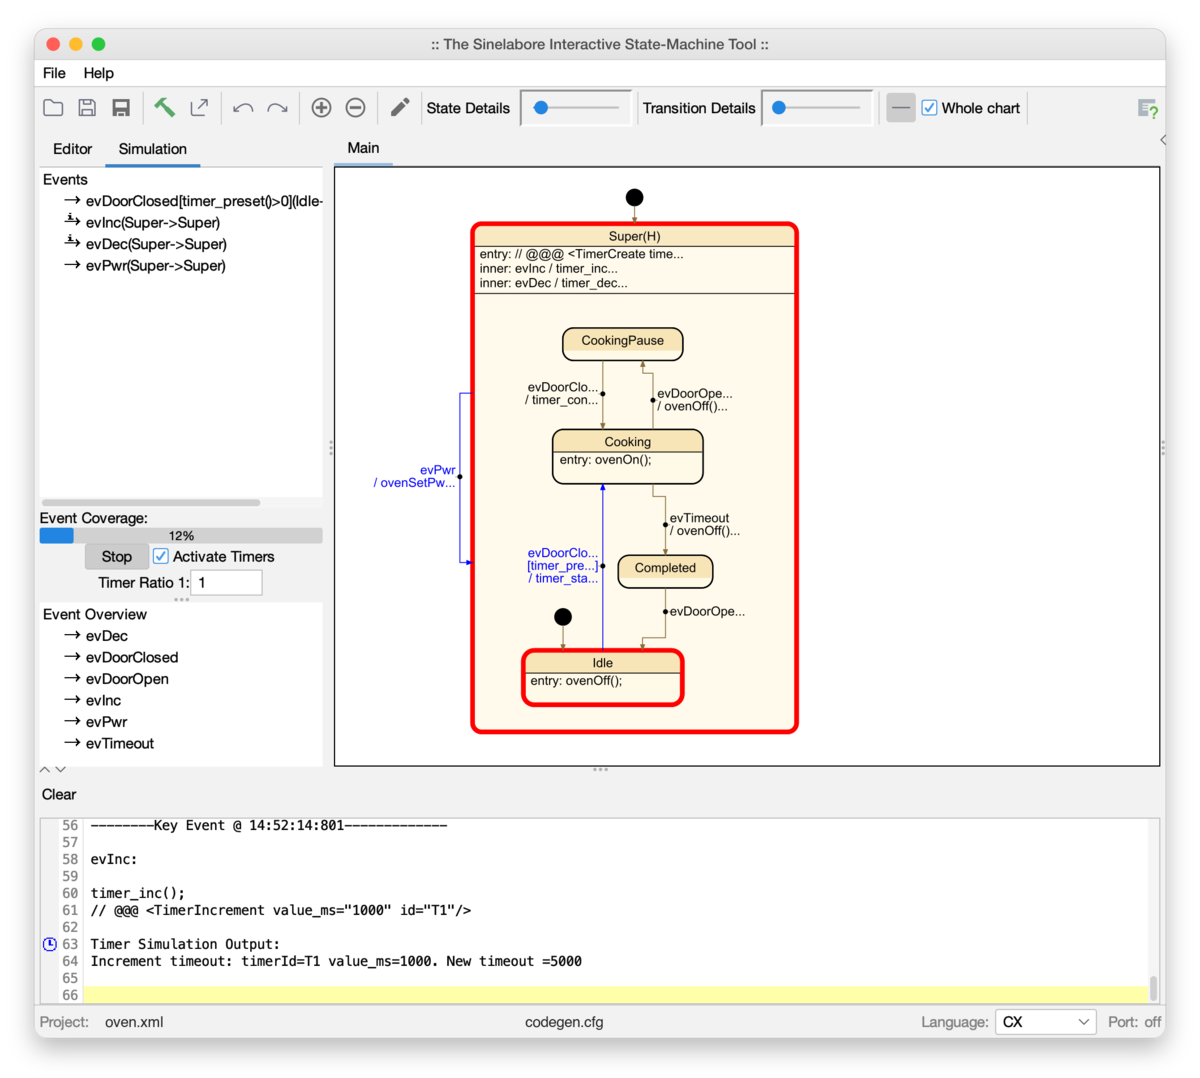
evInc twice: the timeout is now 5 s. The clock icon marks the output of the timer simulation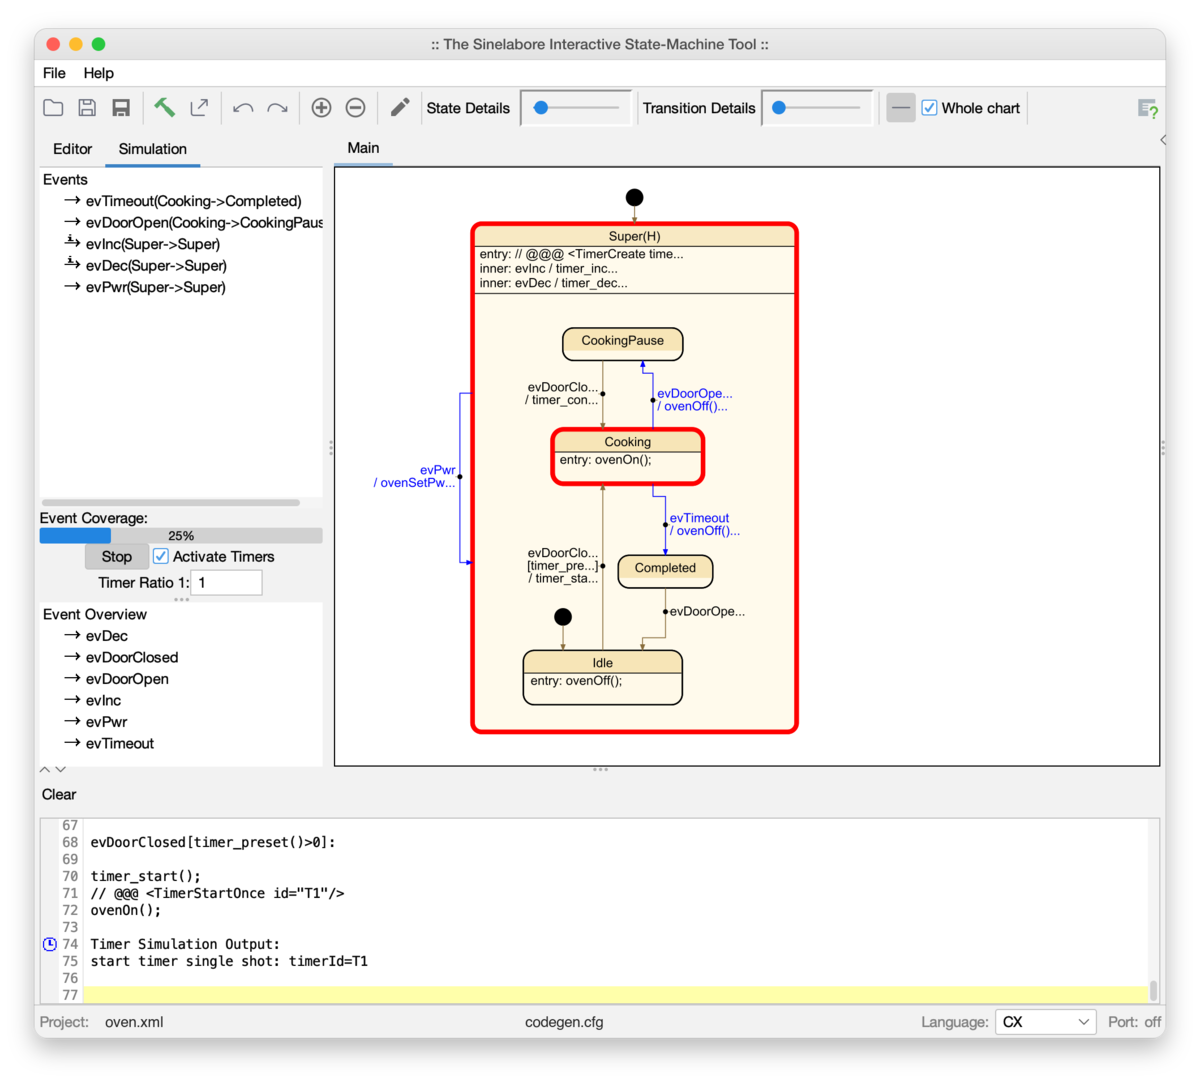
evDoorClosed: the guard holds, the oven is Cooking and T1 runs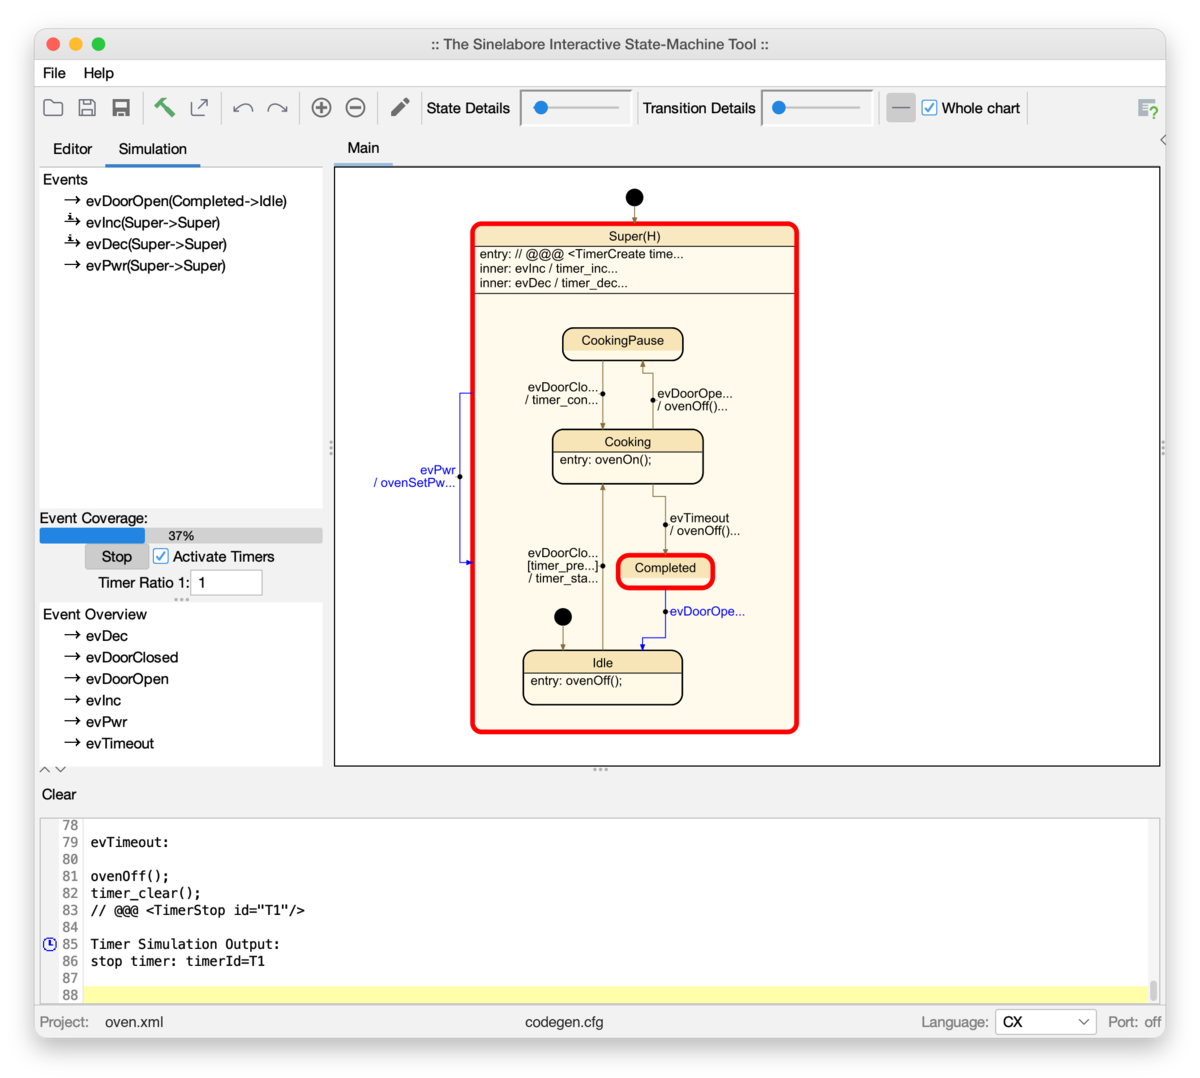
T1 sends evTimeout by itself: Completed, and the timer is stoppedWhile the oven is cooking, the time can still be changed via evDec/evInc, and opening the door pauses the timer until it is closed again.
Link to a YouTube video showing timer simulation in action
Note: it is important that entered program code for timers later realized in C or C++ matches the simulation code in comments. Since this is done in the same input field, this is usually straightforward.
Summary#
With simulation of your design you can easily understand behavior and check whether transitions or other elements were forgotten. Timer simulation further simplifies this and makes simulation more realistic.